Adobe Lightroom Classic – 2025 AI-Enhanced Photo Editing
Adobe Lightroom Classic remains one of the most trusted photo editing tools for professionals and hobbyists alike. Built for deep image control and precise adjustments, it helps photographers streamline their workflow and produce studio-quality results.
With every new Creative Cloud update, Lightroom Classic continues to evolve, introducing powerful AI-assisted tools that simplify editing, organization, and culling while preserving the photographer’s creative intent.
Latest 2025 Updates:
- Assisted Culling (Beta)
- AI-Powered Dust Removal
- Firefly Image Model 5
- Lens Blur with AI Presets
- Video Editing Integration
- Enhanced Color Labels
- Local Tab Access
- Archive Photos Locally
The Adobe Lightroom free trial lasts for 30 days. However, its premium plan is affordable: priced at $11.99 per month through Adobe Creative Cloud.
What is Adobe Lightroom Classic?
Lightroom Classic is a powerful desktop photo editing application designed for detailed photo management, RAW editing, and professional workflows. It enables users to import, organize, and process thousands of images efficiently, with full control over every pixel.
Based on the Adobe Lightroom review we conducted, this software significantly enhances the speed and consistency of professional workflows. It’s an all-encompassing tool every photographer should have in their toolkit.
Key Features of Adobe Lightroom Classic
Let’s dive into some of the key features of Adobe Lightroom Classic.
2025 AI-Powered Features
The October 2025 Creative Cloud update brings a series of advanced AI-powered improvements that redefine how photographers work. These tools reduce editing time and increase creative precision.
Assisted Culling (Public Beta)
A time-saving AI tool that identifies your best photos based on sharpness, focus, eye contact, and composition — ideal for weddings, events, and large shoots.
Generative Remove (Powered by Firefly AI)
Firefly AI’s Generative Remove feature allows users to delete distractions with photorealistic precision. It automatically blends lighting and texture for seamless object removal.
Quick Actions with Scene Detection
Lightroom’s Quick Actions now auto-detect subjects, skies, and backgrounds with exceptional accuracy. You can perform one-click edits like background blur, lighting correction, or content-aware removal. Scene Enhance detects and adjusts snow, water, or ground textures — perfect for landscape photographers.
Dust & Blemish Removal
Enhanced AI detection now removes dust, spots, and blemishes with unmatched accuracy. It’s faster and more reliable across studio portraits and product images.
People & Reflections Removal
AI now helps you remove unwanted people and glass reflections — perfect for travel, product, or real estate photographers.
Firefly Image Model 5 Integration
Adobe’s most advanced image generation and editing model yet, capable of generating images in native 4MP resolution without upscaling, with major advancements in complex multi-layered compositions and natural movement.
Lens Blur with AI Presets
Instantly create a stunning portrait effect in any photo with Lens Blur, powered by AI. Use new one-tap presets to easily focus on your subject and blur out everything else.
Core Editing & Workflow Features
Advanced Masking Tools
Adobe Lightroom Classic’s masking tools provide photographers with unprecedented control over their editing process:
- Select Subject: AI-powered tool automatically detects and selects the main subject
- Select Sky: Isolates sky for dramatic landscape enhancements
- Landscape Detection: Automatically detects elements like mountains, water, snow, and vegetation
- Color & Luminance Range Masking: Precise control over specific colors and brightness levels
- Brush Tool: Manual painting with incredible precision
Content-Aware Remove Tool
The Content-Aware Remove tool lets you erase unwanted objects or blemishes with incredible ease and precision. It automatically samples nearby pixels and blends them seamlessly into the surrounding image.
Batch Processing & Presets
- Batch Processing: Apply edits to multiple images simultaneously using the Quick Develop panel
- Lightroom Presets: Save and apply custom editing configurations with one click
- Adaptive Presets: Apply adjustments to specific areas rather than entire photos
- Settings Transfer: Easily copy adjustments between similar images
RAW File Editing & Color Tools
- Powerful RAW Editor: Complete control over RAW file processing
- Color Variance Tool: Create consistent tones across photo series
- Adaptive Profiles for HDR: Enhanced starting point for HDR photo editing
- Advanced Cropping: Creative cropping with automatic straightening
Organization & Workflow Enhancements
- Batch File Renaming: Create custom templates with variables including Names, Counts, Date, Metadata, and Custom text
- Color Labels & Filtering: Enhanced color labeling with Off, Subdued, or Vivid grid options
- AI Edit Sync: Track and sync AI-based edits across desktop and mobile
- Local Tab Access: Edit locally stored photos without importing to Lightroom
- Archive Photos Locally: Free up Cloud space while maintaining editing access
Overall, these features highlight Adobe’s ongoing focus on automation and precision — helping photographers focus more on creativity while the software handles repetitive tasks.
How to Use Adobe Lightroom Classic: A Step-by-Step Guide
Below is a step-by-step breakdown of Lightroom’s workflow — from importing photos to advanced editing with the latest 2025 features.
1. Importing Photos into Your Catalog
When you open Lightroom Classic, click the “Import…” button at the bottom left of the Library module.
Depending on your Preferences, the Import Dialogue might open automatically when you start Lightroom or insert a memory card.
Import Sources & Methods
From Computer or Hard Drive:
- Select the hard drive and folder(s) of photos to import
- Enable “Include Subfolders” if needed
- Click Add to import without moving photos to new location
- Uncheck any photos you don’t want to import
From Camera Memory Card:
- Select the camera memory card from the left panel
- Enable “Eject after import” to unmount card automatically
- Click Copy (default for memory cards)
- Use Destination panel to organize by date or folders
Import Options Explained
Add: Photos remain in current location, simply appear in Lightroom catalog
Copy: Duplicates photos to new location while keeping originals
Move: Relocates photos to new location and adds to catalog
Copy as DNG: Converts files to DNG format during import
Right-Hand Panel Options
- File Handling: Build previews, don’t import suspected duplicates
- File Renaming: Create custom templates for batch renaming
- Apply During Import: Add develop settings, metadata, keywords
- Destination: Organize by date or into specific folders
2. Understanding Lightroom Classic’s Interface
Lightroom Classic uses a modular workflow with different areas for specific tasks. Click module names at the top right to switch between them.
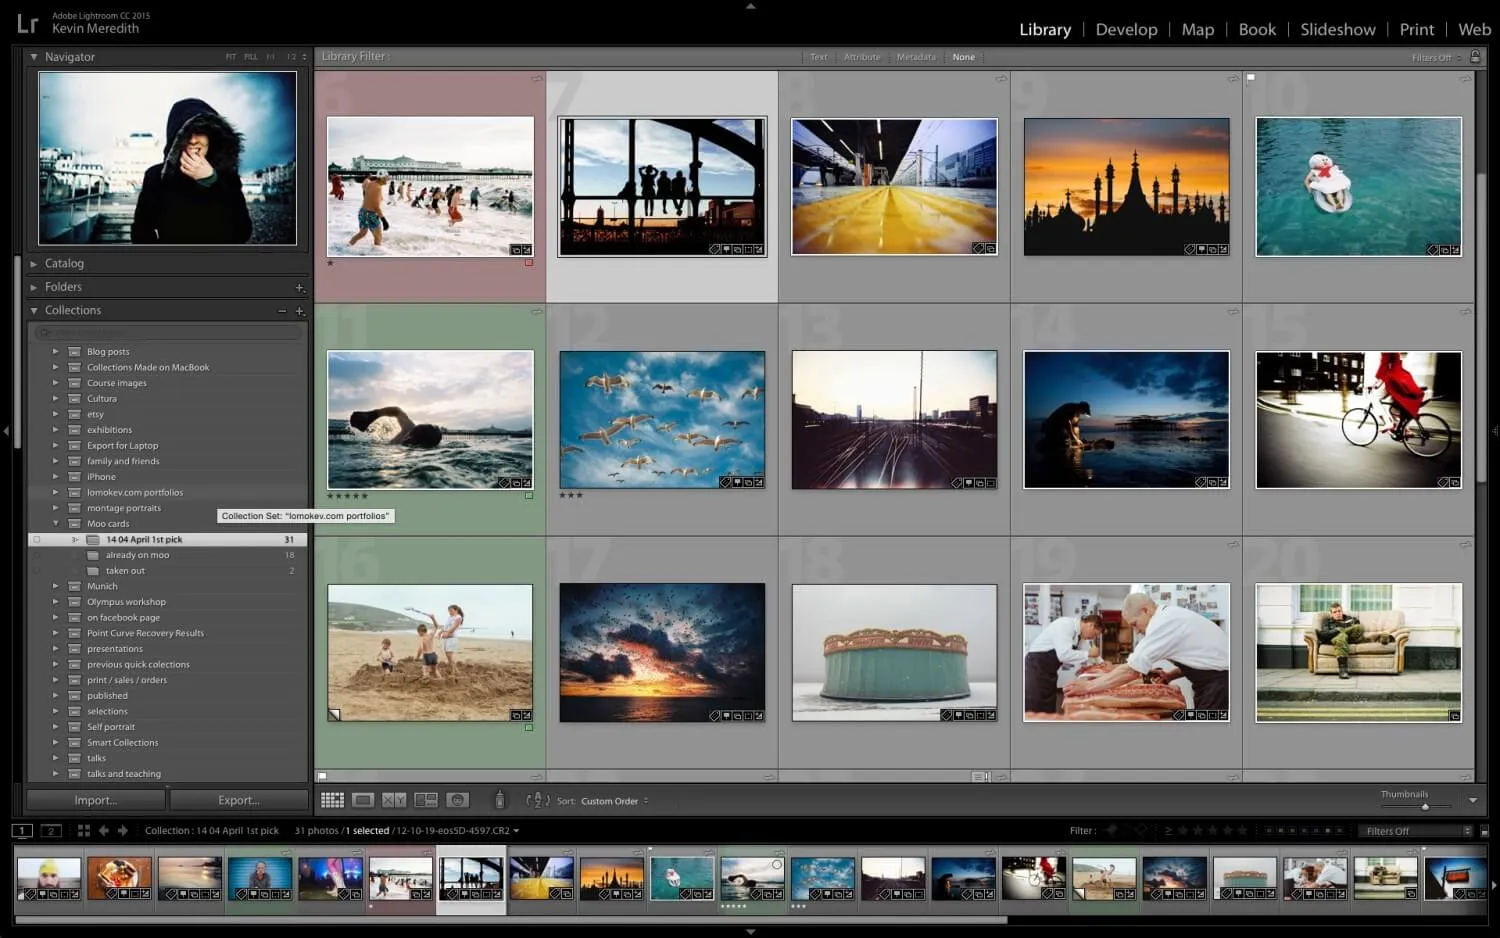
Library Module – Organization Hub

Left Panel Features:
- Navigator: Quick preview and zoom control
- Catalog: Access all photos, quick collection, previous import
- Folders: Your actual computer file structure
- Collections: Virtual organization without moving files
Right Panel Features:
- Quick Develop: Basic adjustments without leaving Library
- Keywording: Add searchable keywords
- Metadata: View camera info, exposure, copyright
- Comments: Notes and ratings
Toolbar & Filmstrip:
- View Modes: Grid, Loupe, Compare, Survey
- Sorting: Organize by date, rating, filename
- Flags & Ratings: Pick/reject flags, star ratings, color labels
- Filmstrip: Persistent image selection across all modules
Develop Module – Editing Powerhouse
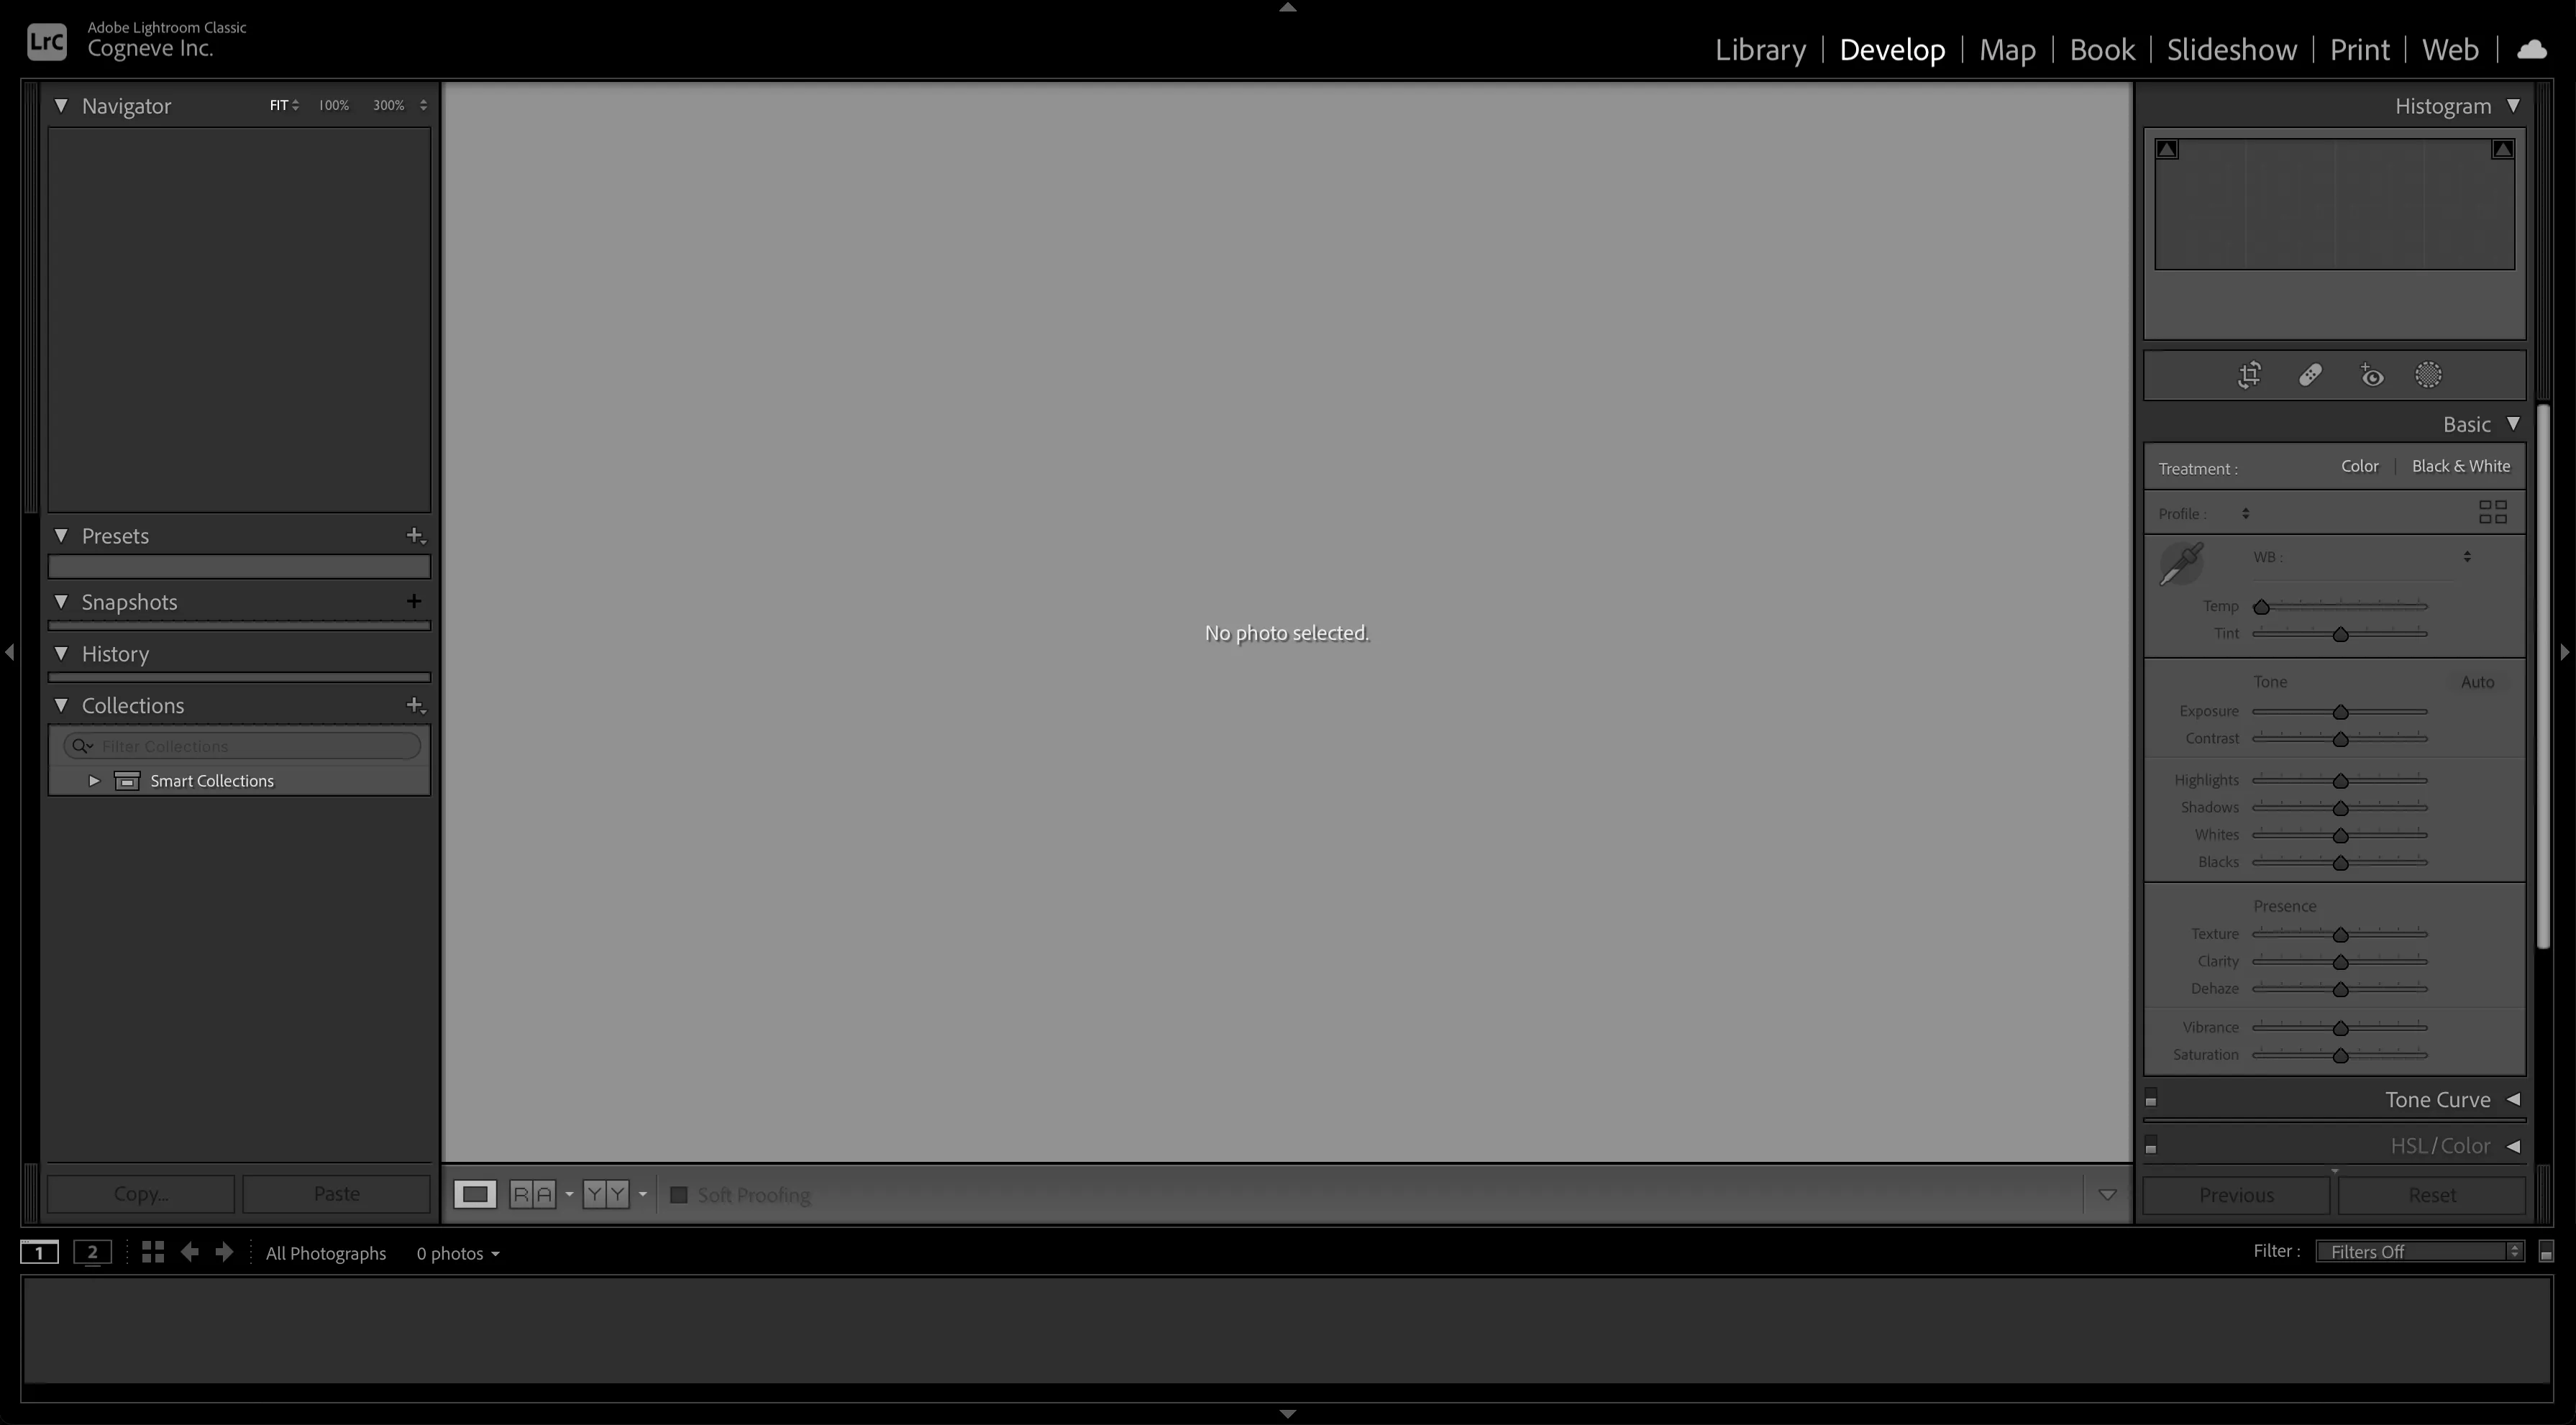
Left Panel – Navigation & History:
- Presets: Apply saved edit configurations
- Snapshots: Save specific edit states
- History: Complete edit timeline, click to revert
- Collections: Quick access to organized groups
Right Panel – Editing Tools:
- Histogram: Visual representation of tones
- Basic Panel: Exposure, contrast, white balance
- Tone Curve: Advanced contrast control
- HSL/Color: Hue, saturation, luminance adjustments
- Detail: Sharpening and noise reduction
- Lens Corrections: Fix distortion and chromatic aberration
- Transform: Straighten and perspective correction
- Effects: Vignettes, grain, dehaze
- Calibration: Camera profile adjustments
Other Essential Modules
- Map: View photos by GPS location
- Book: Create photo books for printing
- Slideshow: Create presentations
- Print: Layout and print photos
- Web: Create web galleries
3. Basic Photo Editing Workflow
Step 1: Start with Auto Adjustments
In the Develop module, click Auto in the Basic panel for instant improvements. Lightroom analyzes your image and applies optimal settings based on professional editing patterns.
Step 2: Fine-Tune Basic Adjustments
- Exposure: Overall brightness (entire image)
- Contrast: Difference between light and dark areas
- Highlights: Brightest areas only
- Shadows: Darkest areas only
- Whites/Blacks: Set pure white and black points
Step 3: Enhance Texture and Clarity
- Texture: Enhance details without affecting edges
- Clarity: Add depth with local contrast (use carefully on portraits)
- Dehaze: Reduce atmospheric haze
Step 4: Color Correction
- Temp/Tint: Adjust overall color cast
- Vibrance: Smart saturation that protects skin tones
- Saturation: Global color intensity
Step 5: Use History for Experimentation
All edits are non-destructive. Use the History panel to revisit any previous state or press Ctrl+Z (Cmd+Z) to undo recent changes.
4. Organizing Your Photos Like a Pro
Collections for Virtual Organization
- Create collections for themes, projects, or clients
- Drag photos to collections without moving files
- Use Collection Sets to organize multiple collections
- Same photo can exist in multiple collections
Rating and Flagging System
- Flags: Pick (white), Reject (black), Unflagged
- Stars: 1-5 star rating system
- Color Labels: Red, yellow, green, blue, purple
- Use Filter Bar to view by attribute (flag, rating, color)
Keyword and Metadata Management
- Add keywords for searchable organization
- Use metadata filters to find specific cameras, lenses, dates
- Batch edit metadata for multiple photos
- Create metadata presets for consistent information
5. New 2025 Workflow Enhancements
AI-Powered Organization
- Assisted Culling: AI identifies best photos based on focus, composition
- Auto Tagging: Intelligent keyword suggestions
- Face Recognition: Improved people detection and grouping
Advanced Masking Tools
- Select Subject: AI automatically detects main subject
- Select Sky: Precise sky selection for dramatic edits
- Color/Luminance Range: Mask by specific colors or brightness
- AI Object Detection: Smart selection of people, objects, landscapes
Content-Aware Editing
- Generative Remove: AI-powered object removal with realistic fills
- Content-Aware Remove: Enhanced spot removal with better blending
- AI Dust Removal: Automatic sensor dust detection and removal
Modern Workflow Features
- Local Tab Access: Edit locally stored photos without importing
- Archive Photos Locally: Free up cloud space while maintaining access
- Enhanced Color Labels: Improved filtering and grid appearance options
- Batch File Renaming: Custom templates with multiple variables
6. Exporting and Sharing Your Work
Export Settings
Go to File > Export to create shareable copies:
- File Format: JPEG, TIFF, PSD, DNG
- Quality: Adjust compression and size
- Resolution: Set for web, print, or specific devices
- Watermarking: Add text or graphic watermarks
- Metadata: Include copyright and contact info
Publish Services
- Direct sharing to social media platforms
- Behance integration for creative portfolios
- FTP upload for websites
- Hard drive publishing for local storage
Pro Tip:
Create export presets for your most common output needs (web, social media, print) to streamline your workflow and maintain consistency across projects.
Adobe Lightroom Presets
Adobe Lightroom Presets are one of the most powerful features in Adobe’s photo editing suite, allowing users to apply a specific set of adjustments to their photos with a single click. Presets are pre-defined settings that can transform exposure, contrast, saturation, color grading, and more instantly.
Why Use Lightroom Presets?
- Consistency: Maintain a consistent aesthetic across multiple photos for portfolios or social media
- Efficiency: Speed up your editing workflow significantly with one-click adjustments
- Customization: Fully customizable after application to fit your specific vision
- Accessibility: Great for beginners learning editing fundamentals and professionals streamlining their workflow
- Creative Exploration: Quickly experiment with different looks and styles without manual adjustments
Types of Lightroom Presets
Recommended Presets
Automatically provided based on your photo analysis using Adobe Sensei AI. The results can change with time, even for the same image. Use carousel filters like Subtle, Strong, B&W, and more to refine selections.
Premium Presets
Custom-crafted by leading professional photographers including categories like:
- Travel & Landscape: Enhance outdoor and scenic photography
- Cinematic: Movie-style color grading and effects
- Seasonal: Adjustments tailored for different seasons
- Adaptive Presets: AI-powered masks for Portraits, Subject, Sky, Landscape, and Background Blur
Adaptive Presets with AI Masking
Advanced presets that create sophisticated AI masks to apply changes to specific image areas:
- Adaptive Sky: Builds highly accurate masks for sky enhancements like Blue Drama, Sunset, Storm Clouds
- Portrait Presets: Target skin tones, eyes, and facial features specifically
- Subject Presets: Isolate and enhance main subjects automatically
- Landscape Presets: Smart detection for natural elements
Your Presets
All presets you’ve created or saved, plus default presets included with Lightroom. Organized and synced across devices via Adobe Cloud.
How to Apply Presets in Lightroom
Basic Preset Application
- Select the Presets tool from the Edit panel
- Browse through Recommended, Premium, or Your presets
- Hover over thumbnails to preview effects instantly
- Click any preset to apply it to your photo
- Use the Amount slider (0-200%) to adjust intensity
Advanced Preset Features
- More Like This: In Recommended presets, hover and select “More like this” for similar variations
- Author Information: View preset creators and follow your favorites
- Favorite Presets: Star presets to add them to your Favorites group for quick access
- View Modes: Switch between thumbnail grid and list view for different browsing experiences
Creating and Managing Your Own Presets
Create Custom Presets
- Apply desired edits to your photo using the Edit panel
- Select the three-dot menu in Presets panel → Create Preset
- Name your preset and select which settings to include
- Save to add to your User Presets collection
Update Existing Presets
Apply a user preset, modify the edit settings, then right-click the preset and select Update With Current Settings.
Batch Apply Presets
- Open an album in Grid view and select multiple photos
- Select the Presets tool and choose your desired preset
- Confirm application in the dialog box
- All selected photos receive the same preset instantly
Preset Management & Organization
Organizational Tools
- Single-Group Mode: Focus on one preset group at a time
- Collapse All Groups: Quickly clean up your preset view
- Keyboard Navigation: Use up/down arrow keys to browse presets efficiently
- Manage Preset Groups: Show/hide specific preset categories as needed
Export and Import
- Export Presets: Right-click any preset and export as XMP files for backup or sharing
- Import Presets: Add third-party or custom presets to expand your library
- Sync Across Devices: Favorites and your presets sync via Adobe Cloud
Presets vs. Profiles: Understanding the Difference
Lightroom Profiles
Profiles modify how Lightroom handles colors and tones without changing edit slider values. They include:
- Adobe Raw Profiles: Color, Landscape, Portrait, Vivid, Monochrome
- Camera Matching: Replicate your camera’s built-in styles (Canon Picture Styles, Fujifilm Film Simulations, etc.)
- Creative Profiles: Artistic, B&W, Modern, Vintage with adjustable Amount sliders
When to Use Each
- Profiles: Best as starting points – affect color rendering before other edits
- Presets: Apply complete edit settings including exposure, contrast, and effects
- Adaptive Presets: Combine AI masking with preset adjustments for targeted edits
Pro Tips for Mastering Lightroom Presets
Workflow Optimization
- Start with Auto Settings: Use Shift+A to apply auto adjustments as a base, then refine with presets
- Use Versions: Save different preset applications as versions to compare results
- Batch Processing: Apply presets to entire shoots for consistent looks, then fine-tune individual images
- Non-Destructive Editing: Remember all preset applications are reversible – your originals are always safe
Creative Techniques
- Stack Presets: Apply multiple presets and adjust amounts for unique combinations
- Customize Adaptive Presets: Use AI masks as starting points, then modify the adjustments
- Create Preset Families: Build related presets for different lighting conditions or seasons
- Use Amount Sliders: Don’t just apply at 100% – often 50-80% creates more natural results
Learning Resources: Dive deeper into presets and editing foundations through Lightroom Academy. Explore recommended and community presets to discover new styles and techniques from professional photographers worldwide.
Adobe Lightroom vs. Adobe Lightroom Classic
Adobe Lightroom and Adobe Lightroom Classic are both powerful tools for photo editing, but they cater to different types of users and workflows.
Adobe Lightroom
- Platform Compatibility: Available on desktop, mobile, and web
- Storage: Cloud-based storage with automatic backups
- Ease of Use: Designed with simplicity in mind for all users
- Organization: Streamlined with automatic tagging
Adobe Lightroom Classic
- Platform Compatibility: Desktop-only application
- Storage: Local storage on your hard drive
- Ease of Use: More complex for photography experts
- Organization: Manual organization with keywords
Adobe Lightroom Classic Review Conclusions
Adobe Lightroom Classic continues to shine as a powerhouse in photo editing. Its commitment to AI innovation, seamless desktop-to-mobile syncing, and customizable workflows make it ideal for professionals who require precision and consistency.
With its latest AI updates in 2025, Lightroom Classic balances deep editing capabilities with smarter automation — making it one of the most powerful tools available for professional and advanced hobbyist photographers alike.
Whether you’re enhancing portraits, landscapes, or commercial shoots, Lightroom Classic offers the right balance of power, speed, and ease-of-use in a software photographers have relied on for decades.


